
 Toyota Camry et,
Toyota Partner.
Toyota Camry et,
DEPOSE
PROCEDURE
1. DEPOSER LA PLAQUE DE SEUIL DE PORTE AVANT GAUCHE
Cliquer ici .gif)
2. DEPOSER LE SOUS-ENSEMBLE D'HABILLAGE LATERAL D'AUVENT GAUCHE
Cliquer ici
3. DEPOSER LE SOUS-ENSEMBLE DE CACHE INFERIEUR DE TABLEAU DE BORD N° 1
Cliquer ici
4. DEBRANCHER LE BOURRELET D'HABILLAGE D'OUVERTURE DE PORTE AVANT GAUCHE
Cliquer ici
5. DEPOSER LE PANNEAU LATERAL GAUCHE DE TABLEAU DE BORD
Cliquer ici
6. DEPOSER LE COMBINE D'INSTRUMENTS DE PROTECTION DE COMBINE D'INSTRUMENTS N° 2
Cliquer ici
7. DEBRANCHER LE SOUS-ENSEMBLE DE LEVIER DE COMMANDE DE VERROUILLAGE DE CAPOT
Cliquer ici
8. DEPOSER LE SOUS-ENSEMBLE DE TABLEAU DE BORD N° 1
Cliquer ici
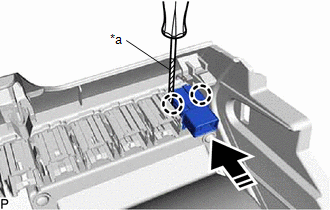
9. DEPOSER LE CONTACTEUR DE FEUX DE ROUTE AUTOMATIQUE
(a) A l'aide d'un tournevis dont la pointe a été préalablement entourée de ruban adhésif de protection, libérer les 2 griffes et déposer le contacteur des feux de route automatiques, comme indiqué sur le schéma.
|
*a | Ruban adhésif de protection |
.png) |
Déposer dans ce sens |
 Pieces Constitutives
 Verification
Pieces Constitutives
PIECES CONSTITUTIVES SCHEMA
*1 SOUS-ENSEMBLE DE CACHE INFERIEUR DE COLONNE DE DIRECTION
*2 CONTACTEUR DES CLIGNOTANTS
*3 CACHE SUPERIEUR DE COLONNE DE DIRECTION
- - ...
Retroviseur Interieur (sans Rétroviseur Ec)
Pieces ConstitutivesPIECES CONSTITUTIVES SCHEMA
*A sans système de sécurité préventive
*B avec système de sécurité préventive
*C fabrication TMC
*D fabrication TMMK
*1 ENSEMBLE DE RETROVISEUR INTE ...
Circuit d'éclairage de plancher
DESCRIPTION L'ECU de carrosserie principale (ECU de carrosserie du réseau multiplex) commande le fonctionnement de l'éclairage de la manière suivante :
Eclairage de plancher gauche (ensemble d'éclairage intérieur gauche n° 1)
Eclairage de plancher d ...